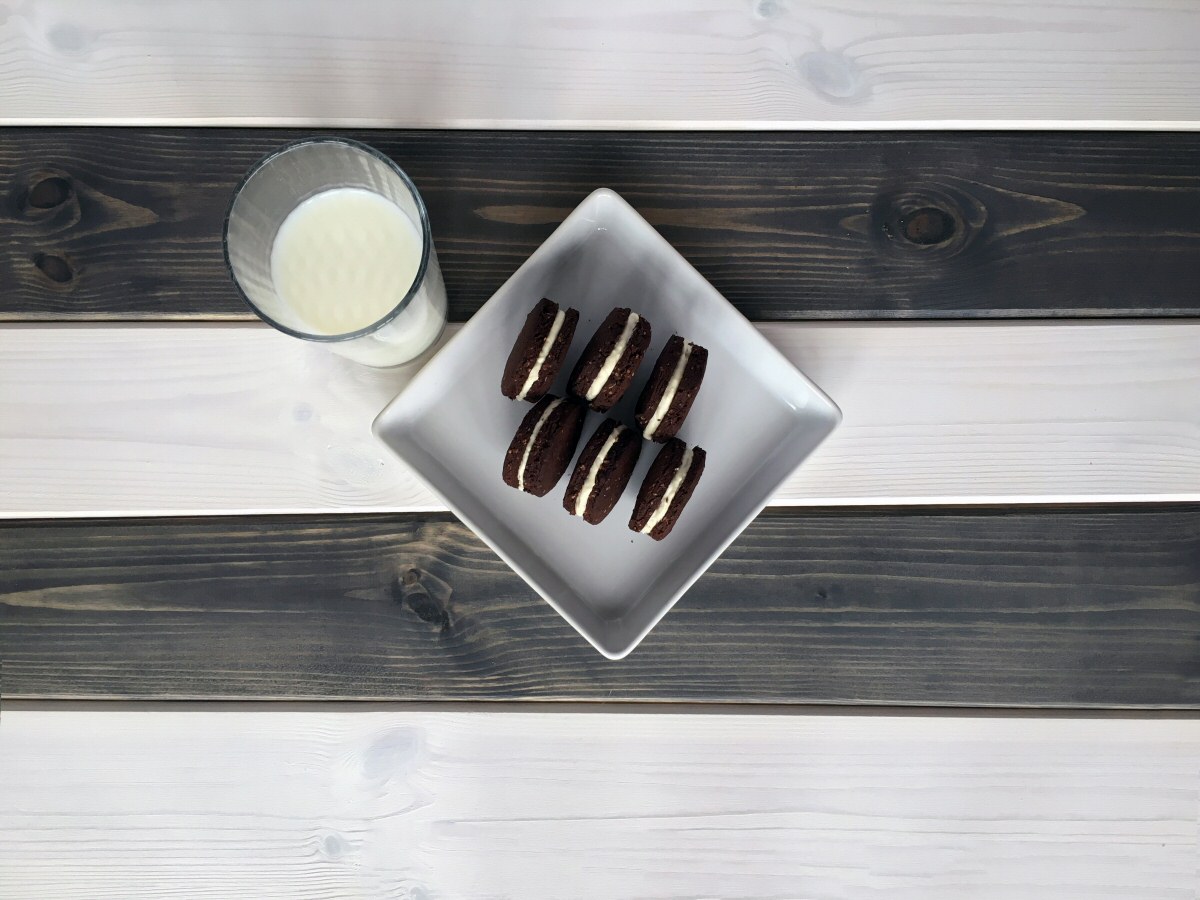
Oreos are one of my weaknesses (alongside Hob Nobs, pretty much any other kind of cookie or biscuit, and obviously all cakes) – in fact, I used to have people smuggling giant cartons of Oreos back from the States for me – because UK supermarkets simple didn’t have enough.
These were a tricky recipe to get right; too much of one kind sweetener and you can end up with something more like a little cake than a cookie; too much cocoa and each bit tastes like a solid, crunchy shot of espresso (because cocoa is bitter , yo) – it was all about finding a balance between not too sweet and not too overbearing. And I’ll be the first to admit – these don’t taste exactly the same as store-bought Oreos (and it’s also worth noting that American Oreos taste WAY different to European Oreos, which are made in Spain. I guess because of all the freedom?), but they are pretty close, and there’s definitely room to tweak the recipe to your taste.
So with that: let’s GET OUR COOKIE ON.
Method
For the cookies
Add the 50g g plain white flour , 30 g rolled oats (or oat flour) , 20 g malt powder , 7 g cocoa powder , 0.25 tsp baking powder and 0.25 tsp stevia to a bowl and combine well. If you don’t have oat flour, just whizz up the same weight of rolled oats in a blender or chopper – I personally use the Ninja Master Prep because it’s small and neat. If you don’t have any malt powder, just substitute with the same quantity of oat flour.
In a separate bowl, add the 35 g butter, softened in small squares, making sure that it is very warm and soft but not yet melted. Make sure that 3 tsps milk is room temperature at the very least – you can always put it in a small dish and heat for 10-20 seconds in the microwave, then add to the butter. Add 1 pinch salt and start to whisk with an electric hand mixer for 20-30 seconds. You may need to scrape the sides of the bowl down with a silicon spatula as you go. Add 0.5 tsp vanilla paste and whisk together for another minute or so until your mixture is soft and smooth. If at any point it looks lumpy, its likely that either your butter isn’t soft enough, or your milk was too cold and hardened up the butter – in this case, pop the bowl into the microwave for 5-10 seconds at most , then continue to whisk with a blender until it becomes smooth.
Combine the dry ingredients with the butter mixture, mixing with a metal spoon or regular dinner knife (I personally prefer the knife, as it combines well without a lot of mixture sticking to it), making sure all of the flour mixture is covered. As you mix, you should notice the pale brown mix turn much darker – once it looks like most of your mixture is combined, it still may seem very loose and crumbly – at this point you can either work it lightly with your hands or with a metal spoon. It might seem quite dry at first, but should get much softer after a few seconds of this. If you’re worried it’s too dry, add up to 1 teaspoon of warm milk to the mix at a time until you’re satisfied. You definitely don’t want it too wet – it should combine easily into a soft ball of dough that isn’t very sticky.
Roll out a sheet of baking/parchment paper on a baking tray and use your palms to gently flatten the dough onto one half of it. Then fold the other half of the baking paper (or put another sheet) over the top of the dough and roll it out with a pin until it’s around half a centimetre (or a fifth of an inch) thick. Then, using a small/medium-sized cookie cutter, cut out your cookies. Depending on the size of your cutter, you should get 12-18 cookies. They should cut easily and not be wet, sticky or overflow once they’ve been cut out. After the first batch have been cut out, roll the ‘waste’ dough into a ball in your hands and repeat until you don’t have enough dough left to cut another cookie.
Arrange your cookies on the baking tray and stick in the fridge for at least 2 hours. Once they have been chilled, pre-heat the oven to 160°c fan (180°c no fan / 350°f) and remove the cookies from the fridge. Transfer them to a different baking tray lined with baking paper (you don’t want to bake them on an ice-cold tray as it will affect the baking time), then put in the oven for 12-15 minutes, checking after 12 minutes. Pay close attention to smaller/thinner cookies, as their edges will brown up noticeably if left in for too long. Transfer immediately to a wire rack to cool down.
For the filling
Sieve 5 tbsps plain white flour and 6 tsps milk powder together into a small bowl, ensuring there are no lumps (milk powder is notorious for clumping together).
Ensuring 20 g butter, softened is very soft and 50 ml milk is warm, add the butter and half of the milk to a bowl and whisk together with an electric hand mixer for 30 seconds or so until smooth. As above, if the mixture is lumpy and not combining, either the butter or the milk was too cold, so warm it up for 5 seconds in the microwave.
Whilst still mixing, add 0.125 tsp vanilla paste , 1 pinch stevia , and the flour mixture a teaspoon at a time until all the ingredients are combined and the mixture is smooth. It should be dense enough to form brief soft peaks (like a thick yoghurt), but not overly stiff (like thick peanut butter). If it’s too stiff and clumpy, add a teaspoon of milk at a time until it’s the right consistency. If it seems too thin, add a teaspoon of flour until it seems right. If you want to go for double-stuff Oreos, you should make your cream filling a little stiffer to ensure it holds.
Using a regular dinner or butter knife, scoop a little of the cream filling onto one cookie (making sure they’re sufficiently cool first) – you don’t have to be particularly careful about it – just lump as much as you like roughly into the middle of the cookie; there’s no need to spread it around. Then take another cookie of approximately the same size and gently rest it on top. You shouldn’t need to press them together – the top half should settle down onto the filling and give you that lovely bulge at the edges. If any pushes out between the edges, just scoop it up with your finger, then gently set the Oreo to one side. Repeat for as many cookies as you have.
Arrange the cookies on a plate and put in the oven for 30-60 minutes. This will allow the filling to set. After that you can take them out and leave them at room temperature – the cream filling won’t go gooey again and will stay set in place.
Hide Method
And with that, you’re done! Now your only problem is trying not to eat them all at once. To be fair, you might find these a touch more rich and almost savoury, with a much more dark-chocolate flavour than out-and-out sweetness – my original attempt at these used 4 times as much cocoa. They were a challenge to eat.
Let me know how you get on with these, and if there are any improvements you’ve made to the recipe!
Nutritional Info
Total Carbohydrates
11.4g
*Typical values per serving.
Hide Nutritional Info


